Azure Multi-Factor Authentication Server with OpenVPN brief How-To
-
I have been having issues with a third party's installation of Azure Multi-Factor Authentication Server working with OpenVPN on pfsense. Since there wasn't a guide out here for configuring pfsense to work with Azure MFA, I figured I'd post "how I got it to work".
-I have never worked with Azure before, so I started by signing up for a free trial. Warning if you intend to do the same, they do require you to enter a method of payment.
-Also, I'm going to assume that you do NOT have a Multi-Factor Auth Provider already configured in Azure, and I am also assuming you are going to use an Active Directory NOT in the Azure cloud.
-When I installed the service onto a local server, I did so as a Domain Admin, I do knot know if that level of authorization is required, but I suspect it is.
-It should go without saying that whatever local server you connect this to will need access to the Internet - I didn't open anything special, I believe the internet connectivity is over TCP 443.
-This is only intended to get dial up to the end user working. Azure Multi-Factor has a userportal for signing people up, plus it can be back ended by RADIUS, LDAP, or AD. My suggestion is to start here and layer on additional settings and security that helps YOU sleep well at night.Once I was logged in, I followed the instructions in this video: http://azure.microsoft.com/en-us/documentation/videos/multi-factor-authentication-server/
Those instructions amount to:
1. Log into the Azure management portal by going here http://azure.microsoft.com/ and clicking on the Portal link.
2. Once logged in, on the left hand side of the screen scroll down to and click Active Directory, then click on Multi-Factor Auth Providers in the right pane.
3. Click the +NEW button to add a new provider. You should see "Multi-Factor Auth Provider" somewhere to the right, and once you mouse over or click that, you can then click the "Quick Create".
4. Give the service a descriptive name, choose a billing model (that's up to you, don't know what to suggest), and set the Directory field to "Do not link a directory" then click "Create."
5. You should now see your new MFA server in your list, if you click on it you should now be able to click the "Manage" button at the bottom center of the window.
6. Once you are in the Manage interface, click "Download".
7. In the download area, click the "Generate Activation Credentials" button and record the credentials it shows you.
8. Now click "Download" to download the server software installation package. Preferably to the server you want to install the MFA service on :)At this point, you have to have a windows box to install this on - I'm not going to go through a build for that. I loaded mine on a Server 2012 R2 install, and there was one BIG caveat that almost caught me out. The MFA server requires .net version 2.something. By default, Server 2012 r2 only has version 4.5.x ENABLED. In order to get access to .net 2.x, you need to go through the "Add Roles and Features" setup in Sever Manager and enable .NET 3.5. You cannot install it from the web on Server 2012 R2! YMMV on other Windows OS's.
9. Once you have .net 3.5 installed on the server, install the executable you downloaded from Azure.
10. Skip the wizard it offers and go directly to Activation.
11. Enter the credentials you generated on the Azure site and click Activate.
12. You will be asked to run another wizard - unless you are configuring more than one MFA server, just cancel this wizard.
13. At this point, the management console for the MFA server should launch.I configured the server to read Active Directory. There is an automatic "sync to Active Directory" I did not get working, so I imported the users "manually." Which is still pretty automated.
First the directory:
14. Click Directory Integration, the select "Use Active Directory" radio button, check "include trusted domains" if you think you need it.Now the users:
15. Click Users, the click the "Import from Active Directory" button.
16. In the "List" tab you can choose to view the directory either by Container Hierarchy or by Security Groups. I chose security groups and grabbed the group I wnated to be able to use OpenVPN with two factor.
17. **VERY IMPORTANT!**If you users don't have phone numbers in their AD profiles, after importing them you either need to edit the names you see here and add phone numbers, or you need to confugre the user portal. I did not configure the user portal since I only had 3 users. I just entered missing phone numbers.Now to tell it to accept connections from pfsense via RADIUS
18.Once you have you users, close the user dialogue and click on RADIUS Authentication icon.
19. Tic the "Enable RADIUS Authentication" checkbox, then on the Client tab click "Add".
20. Fill in the IP address of your pfsense box and the ports you are going to use - probably 1812 for Authentication and 1813 for Accounting. Give it a name, a strong shared secret (remember this for the pfsense confi) and tick the "Require Multi-Factor User Authentication to mach" box. Click OK.If you use anything other than the ports offered and you have Windows firewall on (and you SHOULD have it on), you will need to create a Windws Firewall rule to allow inbound traffic to that port.
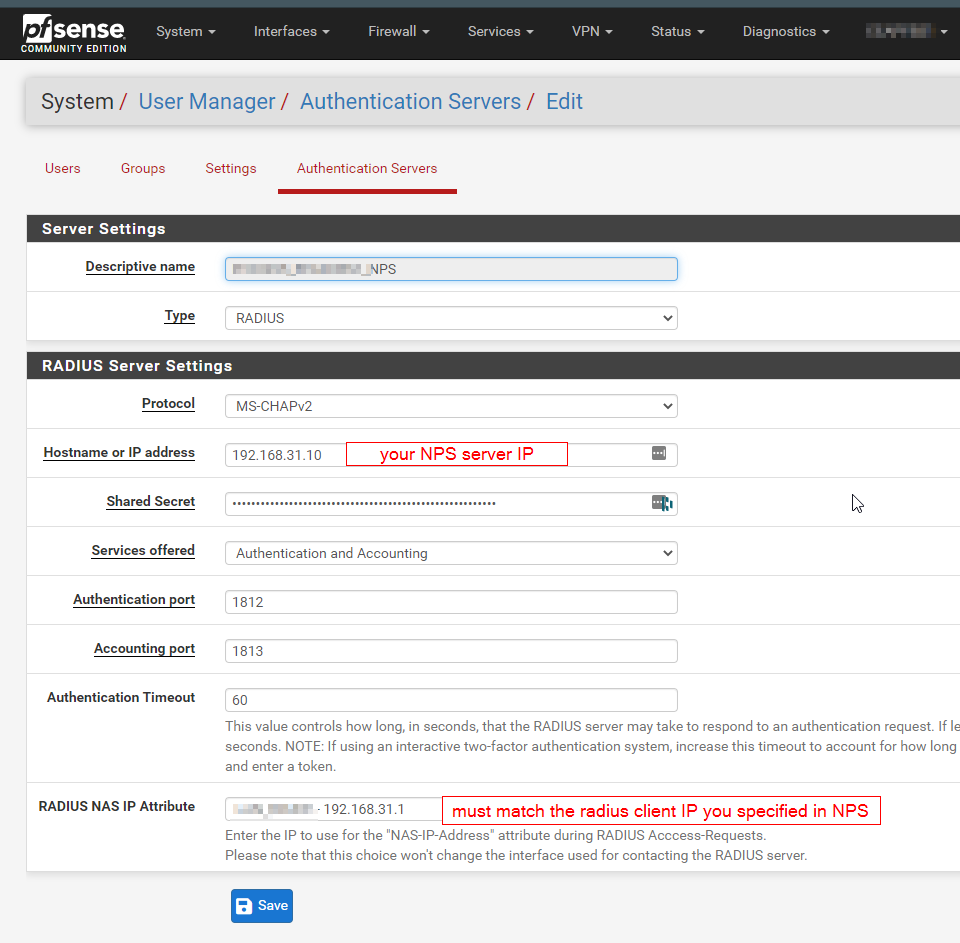
At this point, you should be able to go to your pfsense box, and under System->User Manager ->Servers, add a server, give it a name, set type to RADIUS, put int he IP address of the server you just installed the MFA on, enter the shared secret and the ports you entered on the server, enter an authentication timeout of about 60 seconds, and save it.
You can test auth by going to Diagnostics->Authentication, picking the radius server you just created, putting in a valid AD username that you imported into the MFA server, putting in their password, and clicking test. The user should then get a phone call telling them to hit # to authenticate, as soon as they do you should see the auth succeed at the pfsense.
Once you have tested that, you can use the OpenVPN wizard to create a VPN instance that uses the RADIUS server to auth users, and two factor should work for those users.
-
Replying to this post because it's the top search result for "openvpn pfsense Azure MFA".
I was able to get MFA push prompts working with Azure AD, pfsense and OpenVPN, but the "Add MFA Server" mentioned above is no longer available in the Azure AD console. Instead, I had to install the Azure AD NPS extension.
In short, I did this:
- Added my Windows NPS server in pfsense under User Manager > Authentication servers
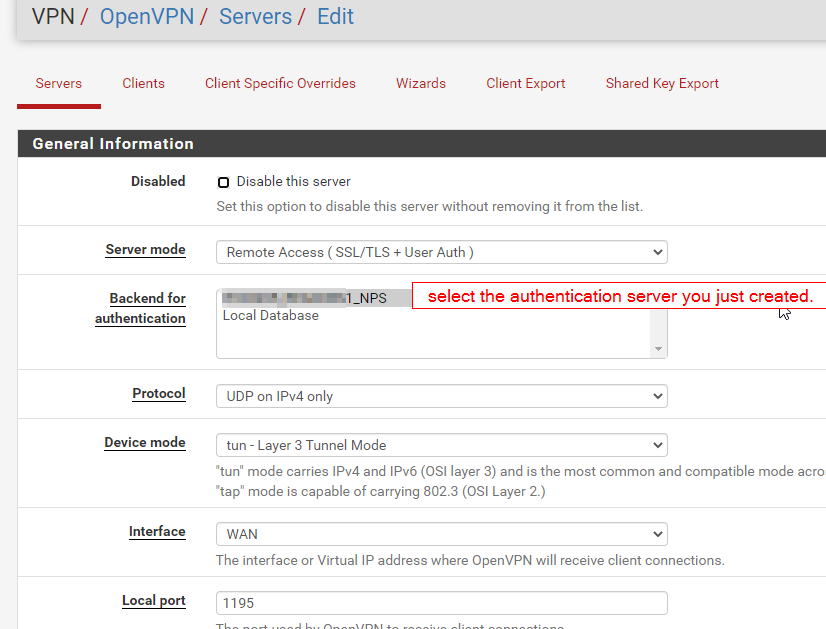
1a. Test radius auth is working by going to Diagnostics > Authentication - Created an OpenVPN VPN server for remote client connections and selected the previously created radius server as the authentication option
- Installed the Azure AD NPS extension using these instructions
3a. It says Azure AD Connect sync is required, which I configured, but found it will actually work without the sync as long as you have your on prem AD account UPN matching with your O365/AzureAD UPN.
3b. I enabled .Net 3.5 via Roles & Features but don't know if it's still requried. - Done - press connect in your openVPN client and enjoy the beauty of push prompt MFA auth on a VPN.
- Added my Windows NPS server in pfsense under User Manager > Authentication servers
-
Hi @jamantus
Thanks for your reply - can you provide detail instruction on how you did the below?
We have RD Gateway working with Azure MFA NPS and NPS Server already - so it should be relatively easy as step 3 is done on our configuration.
Thanks
@jamantus said in Azure Multi-Factor Authentication Server with OpenVPN brief How-To:
Replying to this post because it's the top search result for "openvpn pfsense Azure MFA".
I was able to get MFA push prompts working with Azure AD, pfsense and OpenVPN, but the "Add MFA Server" mentioned above is no longer available in the Azure AD console. Instead, I had to install the Azure AD NPS extension.
In short, I did this:
- Added my Windows NPS server in pfsense under User Manager > Authentication servers
1a. Test radius auth is working by going to Diagnostics > Authentication - Created an OpenVPN VPN server for remote client connections and selected the previously created radius server as the authentication option
- Installed the Azure AD NPS extension using these instructions
3a. It says Azure AD Connect sync is required, which I configured, but found it will actually work without the sync as long as you have your on prem AD account UPN matching with your O365/AzureAD UPN.
3b. I enabled .Net 3.5 via Roles & Features but don't know if it's still requried. - Done - press connect in your openVPN client and enjoy the beauty of push prompt MFA auth on a VPN.
- Added my Windows NPS server in pfsense under User Manager > Authentication servers
-
@apuch Hi, I just followed one of the guides on the internet. Search youtube for "pfsense openvpn radius".
If you already have Azure MFA NPS setup it'll be extremely simple, just add the NPS server in Pfsense and then select that server in the OpenVPN settings
If you want you can set your VPN server config to use "Remote Access - User Auth" only, then you won't need to create local certificate or anything.


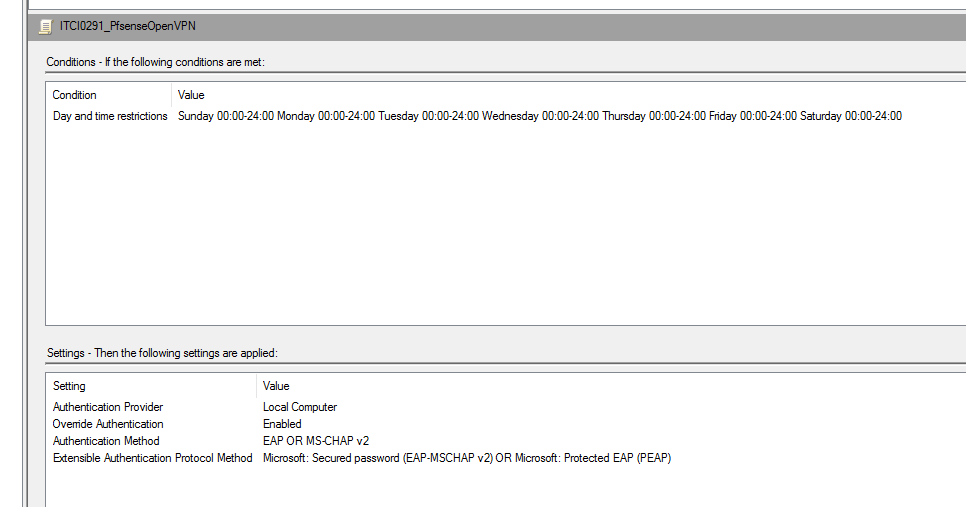
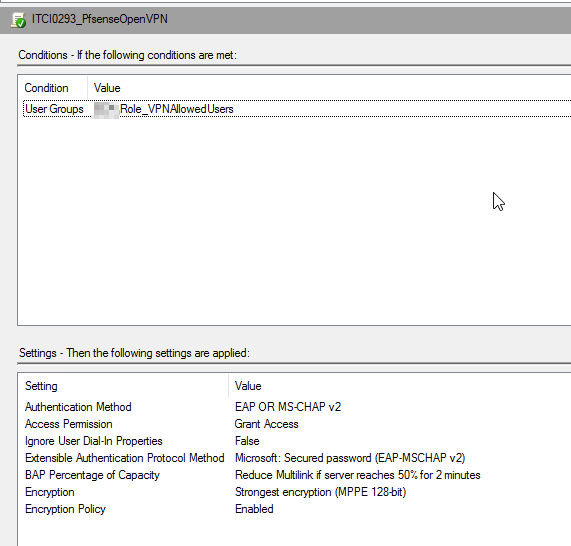
I suppose you may want the NPS server settings as well. It was not hard to set up, I just needed to play around with the different options a bit to get something that worked. Use the pfsense "Diagnostics > Authentication" tool to test, it's very helpful
Here are the NPS Connection Request Policy and Network Policy settings
Connection Request Policy

Network Policy

-
Thanks heaps - I managed to get this working about 30 mins ago :)
Extremely simple, one thing I forgot was I needed to re-export the client config file after we updated the authentication from local database to RADIUS on the openvpn server, once I did this it worked perfectly.
@jamantus said in Azure Multi-Factor Authentication Server with OpenVPN brief How-To:
@apuch Hi, I just followed one of the guides on the internet. Search youtube for "pfsense openvpn radius".
If you already have Azure MFA NPS setup it'll be extremely simple, just add the NPS server in Pfsense and then select that server in the OpenVPN settings
If you want you can set your VPN server config to use "Remote Access - User Auth" only, then you won't need to create local certificate or anything.


-
@apuch cool, no worries
-
Hi @jamantus
Just a query - I now have it rolled out into production but I am finding that it disconnects after some time (Initial testing just now on this issue is about 1 hour, maybe 1 hour 30 mins) before it Authenticator prompt shows up asking to accept again, and the VPN is spinning waiting to accept it.
Did you come across this and were you able to increase it to say something longer like 8 , or 24 hours etc?
Or even disable it reprompting at all?Thanks
-
@apuch I actually recently came across the same issue myself and am searching for a solution too. If you watch the logs you'll see the TLS cert expiring - when this happens it'll send the MFA prompt a few times, and if it is not accepted within a certain time period, the VPN will stop passing traffic (although appearing to stay connected, at least in the Windows OpenVPN connect client). I've had to advise my users to keep their phone in front of them while working so they can see the prompt pop up and just accept it to avoid interrupting connectivity.
I had a brief look but could not see any related settings in pfsense, and also didn't find anything from a quick google. If you find the solution to increase the cert timeout, I'd greatly appreciate a heads up.
-
@jamantus same here.
IP/user removed but this is the log prior to getting the authenticator alert after being on for approx an hour.
Oct 14 11:43:49 openvpn 51963 user/ip TLS Error: local/remote TLS keys are out of sync: [AF_INET]ip [1]
Oct 14 11:43:52 openvpn 51963 user/ip TLS Error: local/remote TLS keys are out of sync: [AF_INET]ip [1]
Oct 14 11:43:56 openvpn 51963 user/ip TLS Error: local/remote TLS keys are out of sync: [AF_INET]ip [1]
Oct 14 11:43:56 openvpn 51963 user/ip TLS Error: local/remote TLS keys are out of sync: [AF_INET]ip [1]
Oct 14 11:43:56 openvpn 51963 user/ip TLS Error: local/remote TLS keys are out of sync: [AF_INET]ip [1]
Oct 14 11:43:57 openvpn 51963 user/ip TLS Error: local/remote TLS keys are out of sync: [AF_INET]ip [1]
Oct 14 11:43:57 openvpn 51963 user/ip TLS Error: local/remote TLS keys are out of sync: [AF_INET]ip [1]
Oct 14 11:43:59 openvpn 51963 user/ip TLS Error: local/remote TLS keys are out of sync: [AF_INET]ip [1]
Oct 14 11:43:59 openvpn 51963 user/ip [user] Inactivity timeout (--ping-restart), restarting
Oct 14 11:44:05 openvpn 51963 TCP connection established with [AF_INET]ip
Oct 14 11:44:05 openvpn 51963 ip peer info: IV_VER=3.git::3e56f9a6
<connection works from here> -
@apuch This could have something to do with it, https://community.openvpn.net/openvpn/wiki/Openvpn23ManPage (search for
--reneg-sec)--reneg-sec n Renegotiate data channel key after n seconds (default=3600). When using dual-factor authentication, note that this default value may cause the end user to be challenged to reauthorize once per hour."but I wonder where to configure that on the pfsense side since we do it via the GUI.
Update (it won't let me post a new reply so soon so I'm editing the post)
oh of course, it's in the custom options box (link)

-
@jamantus Is this server side only or you need to download ovpn and repush out to all clients?
Found this also on another blog:
I’m asked to reauthenticate after some time.
You probably forgot to set the reneg-sec n option in Step 13 of Configuration (or the value you set does not fit your needs). The reneg-sec n option allows you to change the time (in seconds) after which a data channel key renegotiation happens. Set to reneg-sec 0 to never have to authenticate again as long as you don’t disconnect. Setting the option to 0 should fix the issue. If you do not want to generate and export a new OpenVPN configuration file again, you can edit your OpenVPN configuration file manually:- Go to your OpenVPN configuration file directory (C:\Program Files\OpenVPN\config by default) and open your configuration file (*.ovpn). Note that you are going to need administrator privileges to change the file, so run the file as administrator.
- Add the following line to the end of the file: reneg-sec 0. If your file already contains a reneg-sec n option, change its value to 0.
- Save the file.
Cheers!
-
@apuch Seems like it's needed on both ends - if there are different values on each end, it will use the lowest value. So I've decided to set it to 14400 (4 hours) on the server side, and disable on the client side.
The openvpn-client-export package has the same custom options box, so I'm going to putreneg-sec 0and control the setting via the server side to avoid having to push out new config files any time I need to adjust the value.
Server

ClientExport

-
@jamantus Thanks agree - I have added on server and client side, and re-exported.
Can confirm config ovpn now shows "reneg-sec 0"
See how it goes now! Cheers mate. -
T techgal128 referenced this topic on
-
THX, still working ;)
-
Am I missing something here? I have NPS setup and working, but when I add the Azure AD MFA Extension, I keep getting "wrong credentials" on the VPN Client, I never get an MFA notification.
Is there something else required when authenticating with OpenVPN? I have read people posting "add the TOTP code to the end of your password" and all sorts of other things, such as adding the reg key on the NPS server to fall back to the Prompt method (if number matching is enforced)...
I see in the NPS logs upon connecting "Enter Your Microsoft verification code" and I do see an entry in Azure AD when I try...just nothing on the MFA app when I try and connect.
-
I have exactly the same problem and see exactly the same message in the NPS log file. I can connect fine without Microsoft Azure MFA (now called some new brand name like Entra or Identity) and proper NPS RADIUS calls to Active Directory, but I can't add Azure MFA to the VPN setup.
Note that I know for sure that the current setup works with our existing, old Cisco AnyConnect VPN (using the exact same NPS RADIUS server with the exact same Azure MFA and NPS Extension for Azure MFA. So I have hard proof that the Cisco ASA can do it, but as soon as I attempt to swap out the Cisco ASA with the Netgate 4100, it fails unless I remove the MFA requirement.
<Reply-Message data_type="1">Enter Your Microsoft verification code</Reply-Message>In the same log event line, there are these tags:
<Packet-Type data_type="0">11</Packet-Type><Reason-Code data_type="0">0</Reason-Code>The failure is almost instant (it's almost certainly not hitting our 60 second timeout).
Anybody have any ideas on what might have changed in the last few years?
-
It is probably related to the NPS Extension for Azure MFA version, of which we have the latest 1.2.2216.1. My guess is that the prior successful posts were all written when using earlier versions of NPS Extension for Azure MFA.