* SOLUTION POSTED* DNS TLS GETDNS/STUBBY From pfsense/FreeBSD-ports
-
Why I am so damn serious about DNS Privacy ( just watch these when you have time - all at once or in intervals - very educational ):
https://dnsprivacy.org/wiki/display/DP/IETF+DNS+Privacy+Tutorial
https://www.youtube.com/watch?v=JnxE5RPnyiE https://www.youtube.com/watch?v=2JeYIecfwdcActive work is also underway at the IETF on DNS-over-HTTP (DOH) but today the only method standardized by the IETF is DNS-over-TLS. In the world of encryption, it's always safer to go with standardized protocols that have gone through a rigorous review process. Unfortunately DNSCrypt has not been standardized yet, and some of the ways it uses cryptography are unusual.
For all the doubters and naysayers concerning GETDNS and STUBBY - they are developed by NLnet Labs - the same folks who bring us Unbound, NSD, OPENDNSSEC and now GETDNS ( and STUBBY ) see here: https://www.nlnetlabs.nl/ https://www.nlnetlabs.nl/projects/getdns/
Before we get started I have already successfully gone through this process on both a VM and real hardware ( Dell Optiplex 790 Intel-Core i5 USSF ). With that said I am more than willing to share the actual getdns-1.4.1 pfsense package. Perhaps, BBcan177, johnpoz marcelloc or any other Moderators/Developers can upload or share this package with the entire Pfsense Community as is deemed fit and appropriate.. I really am not all that sophisticated in the use of Github and all of that. I thought to offer a link to the final product on my 4shared account - getdns-1.4.1 pfsense package - but I do not know if that would be allowed here in this forum. So, if anyone cares to contact me about this - please feel free. The process is lengthy but well worth it in the end. Read the entire guide first - take a little rest - ruminate - and then begin. Hopefully, I have written it up well enough for most folks to have success.
Dear Pfsense Community,
Hello and I hope that all is well with all. This is a guide / tutorial which explains how to setup adding DNS-Over-TLS support for Pfsense 2.4.3-p1. I run GetDns and Stubby forwarded to and integrated with Unbound. For those who wish to explore Stubby and GetDns - this method is the one recommended by DNSPRIVACY - see here :https://getdnsapi.net/
https://dnsprivacy.org/wiki/display/DP/DNS+Privacy+Daemon+-+Stubby
https://dnsprivacy.org/wiki/display/DP/DNS+Privacy+Clients#DNSPrivacyClients-Unbound - please read this carefully - you will note that it indicates :
Unbound As A DNS TLS Client Features:
Unbound can be run as a local caching forwarder, configured to use SSL upstream, however it cannot yet authenticate upstreams, re-use TCP/TLS connections, be configured for Opportunistic mode or send several of the privacy related options (padding, ECS privacy) etc. Some users combine Unbound (as a caching proxy with other features such as DNS Blacklisting) and Stubby (as a fully featured TLS forwarder).These are the reasons I choose to use GetDns and Stubby with Unbound. Those reasons being so that I can take full advantage of all of the most secure privacy features available when running DNS OVER TLS. What I give you here is the absolute best method of implementation and deployment of DNS OVER TLS. For any and all who may be wondering why DNS OVER TLS is all the rage - read this:
https://tenta.com/blog/post/2017/12/dns-over-tls-vs-dnscrypt So here we go.1 - You can install GetDns and Stubby from Pfsense Ports. Located here -
https://github.com/pfsense/FreeBSD-ports/tree/devel/dns/getdns -the process of installing it to your Pfsense System I will detail in the following tutorial. First, you will need VmWare Work Station or a similar product or an old PC or other hardware for FreeBSD Build Server. I used VMware Workstation Pro 14.1.1 to build this package - getdns-1.4.1.txz .A - By the way, you will notice that you can can install getdns by issuing command " pkg install getdns ". However, if you do this it will not install Stubby. The only method to get Stubby installed is through FreeBsd Ports and using " make config " option. Stubby is essential - please read the following:
https://dnsprivacy.org/wiki/display/DP/About+Stubby
Stubby' is an application that acts as a local DNS Privacy stub resolver (using DNS-over-TLS). Stubby encrypts DNS queries sent from a client machine (desktop or laptop) to a DNS Privacy resolver increasing end user privacy. Stubby is developed by the getdns project.
2 - A - Basically, I followed this guide here - https://gist.github.com/jdillard/3f44d06ba616fec60890488abfd7e5f5 - Making a package for pfSense 2.3. As the guide asserts , you need to set up a FreeBSD (build) server. This is how to do just that as per the guide's instructions. Make sure to install ports on your initial installation !
B - Install and configure the iso below on your Vmware Machine. Here are two links as to how do this if you are somewhat unfamiliar with this process: https://www.tecmint.com/freebsd-11-1-installation-guide/ https://tutorialforlinux.com/2017/02/25/how-to-install-freebsd-11-on-vmware-workstation-step-by-step-easy-guide/ iso install image below:
https://download.freebsd.org/ftp/releases/amd64/amd64/ISO-IMAGES/11.1/FreeBSD-11.1-RELEASE-amd64-disc1.iso.3- After you have installed Freebsd 11 - you need to follow these steps here : https://www.tecmint.com/things-to-do-after-installing-freebsd/
A - The main things I did here ( from the link above ) were to 1. Update FreeBSD System / 2. Install Editors and Bash / 3. Secure SSH on FreeBSD ( you need this to make the rest of this process much easier for you ) / 7. Configure FreeBSD Static IP ( you really should do this while installing and the initial configuartion of Freebsd ) / 9. Manage FreeBSD Services ( very important in order to start programs at boot ).4 - After you have successfully installed and configured your FreeBSD (build) server - it is now time to update your ports collection. I have found that the most effective manner in order to achieve this is as follows: https://www.freebsd.org/doc/handbook/ports-using.html
A - Keep it simple - follow the instructions right at the top of this page - issue these two commands after you ssh into your FreeBSD box - (# portsnap fetch ) and (# portsnap extract ) - you have now updated your ports collection. Now install Portmaster - it is essential to install portmaster AFTER updating ports see here: https://www.freshports.org/ports-mgmt/portmaster - just do this from command line –cd /usr/ports/ports-mgmt/portmaster/ && make install clean -
B - Shutdown your virtual machine. Defragment and Compact your hard drive - always a good practice. Now restart your Freebsd machine - and update portmaster so that it can manage your freshly installed up to date ports collection.
C - Issue the following command - This command is used to upgrade all outdated ports: # portmaster -a
When portmaster reports that you are to update any ports just say " yes " to those updates - there should be only a few if any as you just updated all ports. Finally, I did freebsd-update fetch / freebsd-update install / pkg update / pkg upgrade - just to make sure that my FreeBSD machine is totally updated and upgraded before continuing.5 - Here can can check out GETDNS port: https://www.freshports.org/dns/getdns/ You are now ready to let portmaster install Getdns and Stubby from your ports
collection by issuing the following command:
A - # portmaster dns/getdns - then portmaster will take over and begin installation process
B - you will then be taken to getdns " make config " options setup page - select all options - especially Stubby
C - after entering your selections accept the options by hitting ENTER and portmaster will install getdns6 - After getdns port is installed - you are ready to install pfsense/FreeBSD-ports and make your package ( getdns-1.4.1.txz ) to install on your Pfsense machine. Again, shutdown your virtual machine. Defragment and Compact your hard drive - always a good practice.
It is also a benefit to be able to take snapshots while running VmWare - I would suggest taking several snapshots during this process - now is a good time to do so as well.
7 - You now need to setup pfsense/FreeBSD-ports from github. In order to do so you must install and configure git on your FreeBSD (build) server. Here is how to do that below:
A - # pkg install git / you must then configure git = Issue these cpmmands
B - Configuring Git Examplegit config –global user.name "jhon"
git config –global user.email "jhon@example.com"
git config –global core.editor "nano"
You can check that your updates went through by looking at your configuration settings with:
git config –list
Example Output
user.name=jhon
user.email=jhon@example.com
core.editor=nano
C - Now install pfsense/FreeBSD-ports with the following commands - first # cd /usr/ and then - to clone the pfSense ports repo /git clone https://github.com/pfsense/FreeBSD-ports.git and the final command - # mv FreeBSD-ports ports -
Once again - shutdown your virtual machine. Defragment and Compact your hard drive - always a good practice.
8 - After restarting your FreeBSD (build) server you are ready to build your pfsense getdns-1.4.1.txz package. Do the following:
A - # cd /usr/ports/dns/getdns - it is important to enter this directory and NOT the /usr/ports/FreeBSD-ports/dns/getdns directory !
B - Once inside the /usr/ports/dns/getdns directory - simply issue the following commands in order to build your pfsense getdns-1.4.1.txz package : 1# make clean
2# make package - once this is finished you will have your package.9 - Now you are ready to export your getdns-1.4.1.txz from your FreeBSD (build) server and import / install it to your Pfsense box.
WinSCP ( scp protocol ) into your FreeBSD (build) server. Go into your /usr/ports/dns/getdns directory. Within the directory look for a folder labeled " work " then look for sub directory labeled " pkg " when you open that directory you will find your pfsense getdns-1.4.1.txz package. Transfer ( drag and drop ) that package to a local folder on your desktop - I am on Windows 7.10 - Now fire up your Pfsense box. I have done this so I can save you a few potential headaches as you must do the following before installing Getdns and Stubby on Pfsense. This package has dependencies which are not available in the Pfsense repos. There are only two of them. So do the following first in order to satisfy the package's need for these dependencies:
A # pkg add https://pkg.freebsd.org/FreeBSD:11:amd64/latest/All/libev-4.24,1.txz
B -# pkg add https://pkg.freebsd.org/FreeBSD:11:amd64/latest/All/libidn-1.34.txz
C - pkg install libuv
D - pkg install libyamlIf for any reason while you are attempting to install ( pkg add getdns-1.4.1.txz ) package you receive any other unforeseen nagging messages concerning any other missing dependencies. First try installing them first by issuing ( pkg install ) using Pfsense default package repos. If the dependency is not available in Pfesnse package repo -then use the pkg add https://pkg.freebsd.org/FreeBSD:11:amd64/latest/All/( missing_-dependency.txz) from FreeBsd package repos found here -
https://pkg.freebsd.org/FreeBSD:11:amd64/latest/All/. Then try once again with - pkg add getdns-1.4.1.txz11- WinSCP ( scp protocol ) into your Pfsense box and transfer ( drag and drop ) the getdns-1.4.1.txz package from the local directory you exported it to earlier ( in this case on my Windows 7 machine ) into the /home directory of your Pfsense firewall. You are now ready to install the package with the following ssh commands: # cd /home and then issue the all important command # pkg add getdns-1.4.1.txz ( if for any reason later you need to re-install this package you may do so by issuing command: # cd /home and # pkg add -f getdns-1.4.1.txz - You can remove package from /home directory after everything is up and running by # cd /home and# rm getdns-1.4.1.txz -
12. You are now ready to configure Getdns Stubby and Unbound for DNS over TLS - the proper way. Ryan Steinmetz - the port maintainer and developer of this port was kind enough to include a start up script ( stubby.in ) for this package. See the stubby.in here in the raw : https://svnweb.freebsd.org/ports/head/dns/getdns/files/stubby.in?view=markup. All I had to do was ask him and he did for any and all who elect to use this great piece of FreeBsd software.
13 - Now to put all of this together. The stubby.in file is located here - /usr/local/etc/rc.d/stubby by default. First though Stubby needs Unbound root.key - run this command before getting started:
su -m unbound -c /usr/local/sbin/unbound-anchor Then -
A - Issue this command : # mv /usr/local/etc/rc.d/stubby /usr/local/etc/rc.d/stubby.sh Make it executable - with the following command - it works for me:
chmod 744 /usr/local/etc/rc.d/stubby.sh
14 - Many of you may be familiar with this procedure if you have ever installed DNSCRYPT on PFSense - see example here ( pay special attention to yellow highlighted section ) on page 2 : https://docs.google.com/document/d/1Q8Deap2Yt3UKcMAP7t6PGf_IVbFsD9rk3E6jhuL1RoM/edit
You must enable Stubby Daemon and schedule it to run at boot in the file - open file by going to Diagnostics > Edit File in Pfsense Web Gui ( /usr/local/etc/rc.d/stubby.sh ) - after line item entry ( . /etc/rc.subr ) skip a line and enter the following for startup at boot: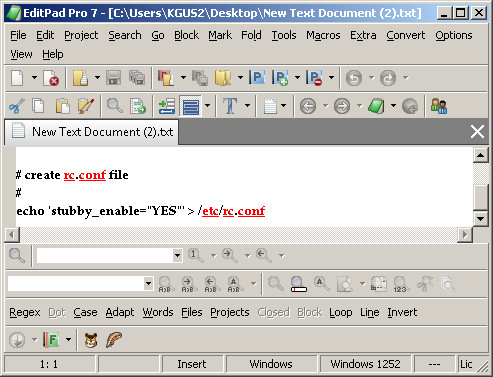
- skip a line after this is entered in /usr/local/etc/rc.d/stubby.sh file
and on line 27 - : ${stubby_enable="NO"} change the setting to : ${stubby_enable="YES"} - that is all you have to do to this file. It comes pre-configured. Save and exit.
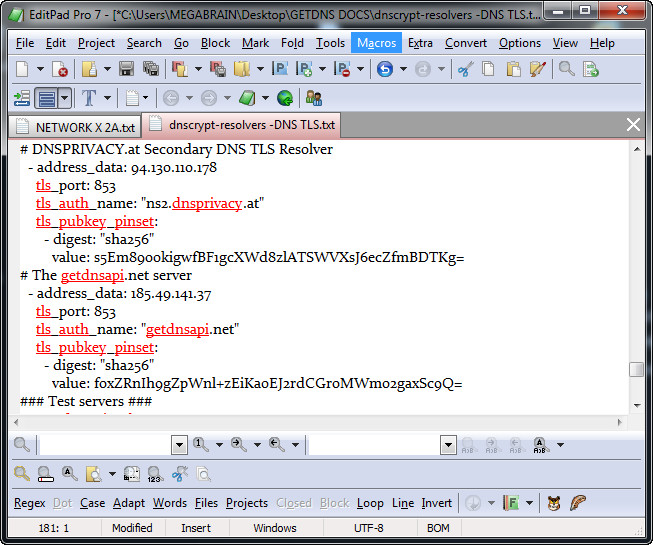
15 - You can and should also check real time status of DNS Privacy Servers as they are experimental and are not always stable - you can monitor DNS TLS Servers Real Time Status here below:
https://dnsprivacy.org/jenkins/job/dnsprivacy-monitoring/. Here is a list of all DNS Privacy Servers in the raw. Add ( tls_port: 853 ) after ( - address_data: ) entry:
https://github.com/getdnsapi/stubby/blob/release/0.2.3/stubby.yml.exampleI have read here: https://www.monperrus.net/martin/randomization-encryption-dns-requests that Also, it is good to set up some servers that listens on port 443 and others on port 853, so as to be resilient if you are on a network with blocked ports. You can also blend IPv4 and IPv6 addresses.
Now you must configure Stubby to resolve DNS OVER TLS - nano /usr/local/etc/stubby/stubby.yml ( or use Diagnostics > Edit File in Pfsense Web Gui ) My config file for Stubby yml: you can choose other resolvers from here: (https://dnsprivacy.org/wiki/display/DP/DNS+Privacy+Test+Servers )
I prefer to run these DNS TLS SERVERS as they tend to be stable most all of the time. In addition, all are located in The Netherlands - a country known for its' well earned reputation for strict privacy policies. All three are the default suggested DNS TLS Servers by DNSPRIVACY and they log traffic volume only.. However, if for any reason you lose internet while running Stubby- chances are it is due to one or more of the servers you are running being down. I told you and it is mentioned on DNSPRIVACY website that all of this ( for the time being ) is experimental. However, even if you run ssl-upstream with Unbound you still will need to monitor real time status of DNS Privacy Test Servers. So, Stubby is still the full featured way to go.
Proper Configuration Examples For Upstream Resolvers:
See here for how to configure Stubby: https://github.com/getdnsapi/stubby
resolution_type: GETDNS_RESOLUTION_STUB
dns_transport_list:
- GETDNS_TRANSPORT_TLS
tls_authentication: GETDNS_AUTHENTICATION_REQUIRED
tls_query_padding_blocksize: 128
edns_client_subnet_private : 1
idle_timeout: 60000 # keep-alive for 1 min, for better performance
listen_addresses:
- 127.0.0.1@8053 ## Stubby/ UNBOUND Address/Port
round_robin_upstreams: 1
upstream_recursive_servers:- address_data: 185.49.141.37
tls_port: 853
tls_auth_name: "getdnsapi.net"
tls_pubkey_pinset:- digest: "sha256"
value: foxZRnIh9gZpWnl+zEiKa0EJ2rdCGroMWm02gaxSc9Q=
- digest: "sha256"
- address_data: 158.64.1.29
tls_auth_name: "kaitain.restena.lu"
tls_port: 853
tls_pubkey_pinset:- digest: "sha256"
value: 7ftvIkA+UeN/ktVkovd/7rPZ6mbkhVI7/8HnFJIiLa4=
- digest: "sha256"
- address_data: 145.100.185.17
tls_port: 853
tls_auth_name: "dnsovertls2.sinodun.com"
tls_pubkey_pinset:- digest: "sha256"
value: NAXBESvpjZMnPWQcrxa2KFIkHV/pDEIjRkA3hLWogSg=
- digest: "sha256"
- address_data: 146.185.167.43
tls_auth_name: "dot.securedns.eu"
tls_port: 443
tls_pubkey_pinset:- digest: "sha256"
value: h3mufC43MEqRD6uE4lz6gAgULZ5/riqH/E+U+jE3H8g=
- digest: "sha256"
- address_data: 199.58.81.218
tls_port: 443
tls_auth_name: "dns.cmrg.net"
tls_pubkey_pinset:- digest: "sha256"
value: 3IOHSS48KOc/zlkKGtI46a9TY9PPKDVGhE3W2ZS4JZo=
- digest: "sha256"
- address_data: 94.130.110.185
tls_port: 853
tls_auth_name: "ns1.dnsprivacy.at"
tls_pubkey_pinset:- digest: "sha256"
value: vqVQ9TcoR9RDY3TpO0MTXw1YQLjF44zdN3/4PkLwtEY=
- digest: "sha256"
- address_data: 94.130.110.178
tls_port: 853
tls_auth_name: "ns2.dnsprivacy.at"
tls_pubkey_pinset:- digest: "sha256"
value: s5Em89o0kigwfBF1gcXWd8zlATSWVXsJ6ecZfmBDTKg=
- digest: "sha256"
- address_data: 89.234.186.112
tls_port: 443
tls_auth_name: "dns.neutopia.org"
tls_pubkey_pinset:- digest: "sha256"
value: wTeXHM8aczvhRSi0cv2qOXkXInoDU+2C+M8MpRyT3OI=
- digest: "sha256"
- address_data: 1.0.0.1
tls_auth_name: "cloudflare-dns.com"
tls_port: 853
#End Sample File
Save and Exit
All of these name servers listed above DO NOT log ! repeat DO NOT log ! your DNS queries. In full disclosure some name servers claim to log traffic volume only. See here for details : https://dnsprivacy.org/wiki/display/DP/DNS+Privacy+Test+Servers and look under " Logging " column. Cloudflare Privacy Policy here: https://developers.cloudflare.com/1.1.1.1/commitment-to-privacy/
DNS query name minimisation to improve privacy, along with DNS resolution speed and accuracy -
Run Test After Completing Full Setup
These name servers listed above help to consistently ensure QNAME Minimisation functions as designed within UNBOUND ( The idea is to minimise the amount of data sent from the DNS resolver to the authoritative name server. )
Use either or both of these two methods to verify QNAME Minimisation
A - Run command : drill txt qnamemintest.internet.nl
and / or
B - Run command: dig txt qnamemintest.internet.nl +short
The results in both scenarios will show either:
HOORAY - QNAME minimisation is enabled on your resolver :)!”
or “NO - QNAME minimisation is NOT enabled on your resolver :(.”
Reference https://discourse.pi-hole.net/t/unbound-and-qname-minimisation/10038/4
You will and should get HOORAY ! - if you used the name servers listed in this guide for your Stubby configuration.Note: Starting with Unbound 1.7.2 qname minimisation is enabled by default.
However, I still add these settings manually.
These settings are entered under Unbound " Custom Options":
qname-minimisation: yes
qname-minimisation-strict: yes16 - Finally, you must configure your Unbound DNS Server to use Stubby for DNS Over TLS.
UNBOUND GENERAL SETTINGS
Network Interfaces = WAN LAN ( all of your LAN interfaces if you have more than one ) And You Must Select Localhost - repeat - You Must Select Localhost !
Under Custom options enter the following :
server:
do-not-query-localhost: no
forward-zone:
name: "." # Allow all DNS queries
forward-addr: 127.0.0.1@8053END OF ENTRY
Outgoing Network Interfaces = Localhost
Make Sure to NOT CHECK - DO NOT CHECK - the box for DNS Query Forwarding. Save and Apply SettingsNext -Under System > Settings > General Settings
Set the first DNS Server to 127.0.0.1 with no gateway selected /Make sure that DNS server option
A - Allow DNS server list to be overridden by DHCP/PPP on WAN - Is Not I repeat - Is Not Checked !
and DNS server option
B - Do not use the DNS Forwarder/Resolver as a DNS server for the firewall Is Not - I repeat - Is Not Checked !
Optionally, along with 127.0.0.1 enter Cloudflare DNS name servers ( 1.1.1.1 and 1.0.0.1 ) under System > General Setup > DNS Server Settings > DNS Servers. Things Will Work Fine and as Intended. Your DNS will still resolve using the upstream name servers you selected in stubby.yml - I have found that it is best to use Cloudflare DNS name servers ( 1.1.1.1 and 1.0.0.1 ) as " custom DNS servers " on the Wan interface. I chose Cloudflare because their name servers support both emerging DNS privacy standards - DNS-over-TLS, and DNS-over-HTTPS, which both provide last mile encryption to keep your DNS queries private and free from tampering. Cloudflare also is the only AnyCast DOT service which also has QNAME minimisation enabled on its' name servers by default.
- Save and Apply Settings
C'est Fini C'est Ci Bon C'est MagnifiqueReboot your router just to sure. Lastly, you can check your DNS at GRC Spoofability Test - DNS Leak - or any of such service. Your results will render the DNS PRIVACY Name Servers which you selected in your stubby.yml configuration file. You are now running DNS OVER TLS with GETDNS plus STUBBY ( a fully featured TLS forwarder ) along with an Unbound DNS Caching Server.
https://www.dnsleaktest.com/ https://www.perfect-privacy.com/dns-leaktest
https://www.grc.com/dns/dns.htm http://www.vpninsights.com/dns-leak-test and last but not leasthttps://cmdns.dev.dns-oarc.net/ for a thorough in depth DNS Test
Now all you need to do is run is a properly configured VPN Service. By doing so, running DNS over TLS with Stubby and GetDns will keep your VPN provider from spying on your encrypted DNS look ups - and also your DNS providers both the ISP ( replaced by encrypted Stubby ) and your Encrypted TLS DNS Service Provider will see your IP as the one from your encrypted tunneled VPN provider.
I am convinced this setup is the right strategy for both security and privacy. I think it to be the best practice for all those most serious about multi-layered cyber security.Special thanks to all who helped me with this project.
Thank you all and God Bless Always In Peace,
Ubernupe - skip a line after this is entered in /usr/local/etc/rc.d/stubby.sh file
-
here is the another tool which you have just missed http://www.vpninsights.com/dns-leak-test instead of ExpressVPN tool, its misleading users.
-
Dear kevrichards,
Hello and thanks for the heads up. I will replace ExpressVPN tool with the tool you cited:http://www.vpninsights.com/dns-leak-test
I am just curious - were you able to follow this tutorial and get everything working? I would appreciate any additional feedback you wish to share with me.
Peace and God Bless.
ubernupe aka directnupe
-
Thanks for this guide, I got it working using your instructions!
I tested my DNS on https://cmdns.dev.dns-oarc.net/
The first time testing I got a "C" - I added the lines below to unbound custom options and it went "up" to "B".
hide-identity: yes
hide-version: yes
hide-trustanchor: yes
harden-glue: yes
harden-dnssec-stripped: yes
num-threads: 2
interface-automatic: yes
msg-cache-slabs: 8m
rrset-cache-slabs: 8m
infra-cache-slabs: 8m
key-cache-slabs: 8m
rrset-cache-size: 256m
msg-cache-size: 128m
so-rcvbuf: 1m
unwanted-reply-threshold: 10000
val-clean-additional: yes
use-caps-for-id: yes
do-ip6: no
do-ip4: yes
do-tcp: yes
minimal-responses: yes
prefetch: yes
qname-minimisation: yes
qname-minimisation-strict: yes
rrset-roundrobin: yes
target-fetch-policy: "0 0 0 0 0" -
@actionhenk
Thanks for your feedback and I am glad that you got this ( DNS OVER TLS ) working on Pfsense. I have applied your tweaks in order to improve my cache performance.
Thanks for that insight and input on that front.
Also you will always get a " B " if you do not have IPV6 enabled and resolving on your Pfsense Firewall. I was getting a " B " on https://cmdns.dev.dns-oarc.net/ prior to using your tweaks due to my not allowing IPV6.
I was concerned about my instructions being clear enough - so again thanks.Peace,
ubernupe
-
Just wanted to thank you for the guide. I was able to follow along well enough (there were a few tangents that interrupt the flow of things) with the little experience I have as a hobbyist. It seems to be working beautifully. For reference, using DNS over TLS with Unbound directly resulted in uncached lookups of: Min .284 Max 1.080 Avg .485. With Stubby it went down to a highly respectable: Min .027 Max .259 Avg .072. The worst part with unbound was loading a resource that incorporated other domains resulting in several lookups occuring back-to-back as the page loaded, really bogging things down (compared to standard DNS). I am currently only using IPv4 in this implementation, but will eventually setup v6.
-
@gorlilla
I am glad to hear that you were able to get this up and running. Also, I truly appreciate your feedback and thanks. We are all in this together and when you get some time -check out some or all of the videos linked at the top of this post. The DNS Privacy Team are very serious and dedicated people and truly very skilled and adept in their mission to keep us all safe while using the web. They are the real heroes - I was just glad to be able to pass on what I learned. God's Speed- AlwaysIn Peace,
ubernupe -
I am running into a small issue, mayb you have also noticed. In pfsense development version 2.4-4 there is an option to show DNS resolver status and it shows a response status of the DNS running, in this case stubby. It is running locally however I am seeing pings between 150 and 250. Sometimes it spikes up to 5000+ and unfortunately this times out resolving.
I think its strange to have such a high ping to a locally running service.
Have you also run into this issue ? If so, were you able to solve it ?
-
@actionhenk
I am running the stable branch of PfSense - 2.4.3- However, I will setup 2.4.4 on a VM and test it out and get back to you like tomorrow.
I will ask what resolvers are configured in your /usr/local/etc/stubby/stubby.yml file?
check here for my recommended resolvers in my answer to nikkon who asks a similar question to yours:
https://forum.opnsense.org/index.php?topic=8759.0 -
Below is the stubby config im using.
resolution_type: GETDNS_RESOLUTION_STUB dns_transport_list: - GETDNS_TRANSPORT_TLS tls_authentication: GETDNS_AUTHENTICATION_REQUIRED dnssec_return_status: GETDNS_EXTENSION_TRUE tls_query_padding_blocksize: 256 edns_client_subnet_private : 1 idle_timeout: 60000 listen_addresses: - 172.28.57.252@8069 dnssec_trust_anchors: "/usr/local/etc/unbound/root.key" round_robin_upstreams: 1 upstream_recursive_servers: # cloudflare1 - address_data: 1.1.1.1 tls_port: 853 tls_auth_name: "cloudflare-dns.com" tls_pubkey_pinset: - digest: "sha256" value: yioEpqeR4WtDwE9YxNVnCEkTxIjx6EEIwFSQW+lJsbc= # cloudflare2 - address_data: 1.0.0.1 tls_port: 853 tls_auth_name: "cloudflare-dns.com" tls_pubkey_pinset: - digest: "sha256" value: yioEpqeR4WtDwE9YxNVnCEkTxIjx6EEIwFSQW+lJsbc= # dot.securedns.eu - HAProxy + Bind # - address_data: 146.185.167.43 # tls_port: 853 # tls_auth_name: "dot.securedns.eu" # tls_pubkey_pinset: # - digest: "sha256" # value: h3mufC43MEqRD6uE4lz6gAgULZ5/riqH/E+U+jE3H8g= # ns1.dnsprivacy.at - Unbound - address_data: 94.130.110.185 tls_port: 853 tls_auth_name: "ns1.dnsprivacy.at" tls_pubkey_pinset: - digest: "sha256" value: vqVQ9TcoR9RDY3TpO0MTXw1YQLjF44zdN3/4PkLwtEY= # ns2.dnsprivacy.at - Unbound - address_data: 94.130.110.178 tls_port: 853 tls_auth_name: "ns2.dnsprivacy.at" tls_pubkey_pinset: - digest: "sha256" value: s5Em89o0kigwfBF1gcXWd8zlATSWVXsJ6ecZfmBDTKg= # dnsovertls.sinodun.com - HAProxy + Bind 9.12 # - address_data: 145.100.185.15 # tls_port: 853 # tls_auth_name: "dnsovertls.sinodun.com" # tls_pubkey_pinset: # - digest: "sha256" # value: 62lKu9HsDVbyiPenApnc4sfmSYTHOVfFgL3pyB+cBL4= # dnsovertls1.sinodun.com - HAProxy + Bind 9.12 # - address_data: 145.100.185.16 # tls_port: 853 # tls_auth_name: "dnsovertls1.sinodun.com" # tls_pubkey_pinset: # - digest: "sha256" # value: cE2ecALeE5B+urJhDrJlVFmf38cJLAvqekONvjvpqUA= # dnsovertls2.sinodun.com - HAProxy + Bind 9.12 # - address_data: 145.100.185.17 # tls_port: 853 # tls_auth_name: "dnsovertls2.sinodun.com" # tls_pubkey_pinset: # - digest: "sha256" # value: NAXBESvpjZMnPWQcrxa2KFIkHV/pDEIjRkA3hLWogSg= # dnsovertls3.sinodun.com - HAProxy + Bind 9.12 # - address_data: 145.100.185.18 # tls_port: 853 # tls_auth_name: "dnsovertls3.sinodun.com" # tls_pubkey_pinset: # - digest: "sha256" # value: 5SpFz7JEPzF71hditH1v2dBhSErPUMcLPJx1uk2svT8= # DKG - knot # - address_data: 199.58.81.218 # tls_port: 853 # tls_auth_name: "dns.cmrg.net" # tls_pubkey_pinset: # - digest: "sha256" # value: 3IOHSS48KOc/zlkKGtI46a9TY9PPKDVGhE3W2ZS4JZo= # dns.neutopia.org - knot # - address_data: 89.234.186.112 # tls_port: 853 # tls_auth_name: "dns.neutopia.org" # tls_pubkey_pinset: # - digest: "sha256" # value: wTeXHM8aczvhRSi0cv2qOXkXInoDU+2C+M8MpRyT3OI= # getdnsapi.net - Unbound # - address_data: 185.49.141.37 # tls_port: 853 # tls_auth_name: "getdnsapi.net" # tls_pubkey_pinset: # - digest: "sha256" # value: foxZRnIh9gZpWnl+zEiKa0EJ2rdCGroMWm02gaxSc9Q= # UncensoredDNS - ? # - address_data: 89.233.43.71 # tls_port: 853 # tls_auth_name: "unicast.censurfridns.dk" # tls_pubkey_pinset: # - digest: "sha256" # value: wikE3jYAA6jQmXYTr/rbHeEPmC78dQwZbQp6WdrseEs= -
I think im looking at this wrong, this is probably ping times from stubby to the dns servers. I removed all servers except clouddns and ping is at 30 now.
-
@actionhenk
I tried to test pfsense 2.4.4 development but I can not install the damn thing to a VMware virtual machine ( or virtualbox ) for that matter.
Can you or any else give me some step by step instructions of how to achieve this?
Pfsense in all their wisdom - Netgate - has gotten rid of the CD-rom iso. I have tried many different methods - rufus - and all of that - none worked.
As far as your setup - I notice that you are using :listen_addresses:
- 172.28.57.252@8069
By default Stubby listens on 127.0.0.1 - so I do not know if this might be giving you some of the issues you cited earlier regarding ping times. Seems like if you have it listening on your Wan - that might account for the other traffic causing some level of interference.
I set up this tutorial following the guidelines which were set forth by DNS Privacy. I do not know if your deviating from these default is a good practice or not. Maybe you can give me your rationale for doing so. I would be interested in hearing your thoughts and reasons for this. I might learn something new. Thanks and Peace Unto You and Yours,ubernupe
-
You can install the latest pfsense from the iso. After the installation you can update to development version using the update menu in general. Select it from the dropdown box.
The 172 is what i use for my lan. Im not using 127.0.0.1 because i have read, not 100% sure, that pfsense will still use root hints sometimes to resolve queries on its own.
Wanted to be sure it doesnt and using the lan address allows me to uncheck the checkbox to use localhost as resolver from the general settings and change listening and outgoing interface to not include localhost, the custom option in unbind can be changed aswell (do-not-query-localhost) so it wont use localhost anymore.
I have also tested the ping times from a fresh install and its the same, so im pretty sure the ping times are to the cloud dns server.
-
@actionhenk
Thank you - and I did as you suggested and got 2.4.4 devel installed now. Also, thanks for your thoughts on using lan. I am going to research that and I did learn something ( very enlightening )- I truly appreciate youGod Bless,
ubernupe